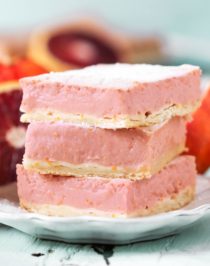
Guilt Free Blood Orange Bars
If you like Lemon Bars but are looking for something a little more unique, then these Blood Orange Bars are for YOU! These have the perfect balance of tart and sweet, they’re full of refreshing orange flavor, and have a beautiful pink color. Best of all, these bars will satisfy your sweet tooth and dessert cravings without the excess sugar, calories, and fat. Yep, I said it. These are guilt-free!
Thanks to Immaculate Baking Co. for sponsoring this post, and thank YOU for supporting the brands that keep Desserts With Benefits going! All opinions are mine and mine alone.
")
I’ve had Blood Orange Bars on my recipe wishlist for years now, I don’t know why I waited so long to make them… but when I saw blood oranges at the grocery store, I knew it was time. I finally pulled the trigger (impulsively bought 10 blood oranges haha) and baked off a batch.
And y’all, I’m SO glad I did!
Most recipes online are full of nasties — a typical recipe will call for something like 1½ cups of sugar and 2 sticks of butter — but not this one. These Blood Orange Bars don’t have any added butter, oil, or sugar… and you’d never know it! The pie crust base is delicious, light, tender, and flavorful. The filling is perfectly sweet, smooth, creamy, and oh so heavenly. Together, they pair to make a satisfying dessert for any time of day.
These Guilt-Free Blood Orange Bars are sweeter and less tart compared to Lemon Bars, but they’re not tooth-achingly sweet either. They pack a serious flavor punch that’ll awaken your senses.
These will be gone in a flash, I promise ya that. Let’s just say we finished off the entire batch in a short two days…
This recipe took three trials to get right. Let’s walk through ’em together, shall we?
Trial #1:
I originally planned on making Blood Orange Bars with a sugar cookie crust. I made a batch of sugar cookies and pressed it into an 8″ brownie pan. The batch definitely made way too much dough for the pan, so I ended up scooping out about ⅓ of it. I put it in the oven and it puffed up so much it looked like a cake. It also took fooorrreeverrrr to bake (should’ve scooped more dough out, oops)! When the base finally was baked through, I poured in the blood orange filling. The final (successful) recipe requires cooking the filling into a curd before baking, but in this first trial I just whisked together the filling ingredients and poured it over the crust. Once the bars were done baking, I took them out of the oven. I’m not sure what the heck happened, but the filling baked off a hideous brown color. It also didn’t smell very good… aka it had a faint smell of scrambled eggs. Gross. I crossed my fingers and hoped it could be salvaged. That was, until I sliced into them. What a complete and utter fail. Like, I laughed out loud it was so ridiculous. The center of the sugar cookies turned GREEN and the blood orange filling was a murky brown. Definitely not the look I was going for lol. I’ve heard of the green color happening before in baked goods, which is caused by a chemical reaction (in this case, the acid in the blood oranges probably mixed with the leavening in the sugar cookie crust). Well, onto Trial #2…
Trial #2:
I decided against using sugar cookies in the crust and instead used my favorite store-bought pie crust by Immaculate Baking Co. Since the filling of the last trial was completely horrendous, I tried cooking it into a curd before baking, hoping that that would prevent it from turning brown. It worked! After baking the crust, adding the filling, and baking it one last time, the bars were done. Once again, I crossed my fingers and hoped for the best. Coming out of the oven, they looked and smelled great! After chilling the bars overnight, I sliced them open and tried a slice. It was absolutely delicious, but definitely a little too sweet. The color was 100% better than the last trial, but it didn’t scream “blood orange.” Just to make sure the bars were perfect, I revised the recipe for Trial #3.
Trial #3:
To improve the sweetness level and color of the filling, I decreased the sweetener and added a secret ingredient… BEETS. Only 2 tablespoons, though, don’t worry. These Blood Orange Bars don’t taste like beets at all. Trust me, I despise the flavor of beets. I cooked the filling into a curd, added the beets, and then into the oven it went. A short 10 minutes later, I was gifted with the most glorious Blood Orange Bars I could’ve ever asked for. It is 100% perfection, from the crust to the filling. These are sweet, simple, and ultimately satisfying. If you’ve got a sweet tooth like me, you will be in (guilt-free) dessert heaven! 😉
")
You seriously gotta make this for yourself. You’ll be so glad you did.
Blood Orange Bars have been on my recipe wishlist for years, and I’m so happy I finally got around to making them. I like Lemon Bars, don’t get me wrong, but I LOVE these.
Since they’re made without any added butter, oil, or sugar, this is a dessert you can feel good about indulging in. Guilt-free dessert without the guilt-free taste? Heck yes. Could today get any better?!?
")
Guilt-Free Blood Orange Bars
Ingredients
Filling:
- 1 cup + 2 tbs Blood Orange Juice
- 1 tbs Blood Orange Zest
- 5 large Eggs
- 3 large Egg Yolks
- 2½ tbs Organic Corn Starch
- ½ cup Granulated Erythritol
- ⅛ tsp Salt
- 1 small Raw Beet peeled
Instructions
- Preheat your oven to 350 degrees Fahrenheit. Take the pie crust out of the fridge and let it thaw at room temperature for ~45 minutes, or until soft and dough-like.
- Place a double boiler over medium heat with about 2” of water. In the top portion of the double boiler, whisk together the eggs, egg yolks, and corn starch.
- Whisk in the erythritol and salt until completely smooth, then whisk in the blood orange juice and zest.
- Using a citrus zester, grate 2 tablespoons of the beet. Whisk into the blood orange mixture.
- Whisk occasionally for ~5 minutes. When the water in the double boiler starts to boil, whisk the mixture constantly to prevent the eggs from scrambling. Whisk constantly until thickened. It should seem like it’s not going anywhere for a while, then it will thicken quite suddenly. When this happens, turn off the heat but keep whisking the mixture over the double boiler for ~1 minute, or until it’s thick like a pudding. Remove the top portion from the double boiler and let cool while you make the crust.
- Unroll the softened pie crust and press it into an unlined, ungreased 8” brownie pan to get an even layer. Bake for ~18 minutes, or until golden brown.
- Scoop the blood orange filling over the crust and spread it out. Tap the pan on the counter a few times to remove any air bubbles. Bake for ~10 minutes, or until the center no longer jiggles. Let cool completely, then cover and refrigerate overnight.
- Slice and serve the following day!
I served my Blood Orange Bars with a dusting of powdered erythritol, but you can use powdered sugar, natural whipped cream, sliced blood oranges, or even fresh raspberries 🙂
Go ahead, have another bar. You won’t feel weighed down, and you won’t get a sugar-rush and sugar-crash either!
")
Enjoy!
.
With love and good eats,
.
– Jess
.
Indulge − no strings attached!


I love blood oranges but have never used them in baking before. These bars look great and are such a pretty color!
As an alternative to the pie crust, do you think a ‘crust’ made of ground nuts and dates and coconut oil would work for this recipe?
I never had a frozen pot pie till I was in the 8th grade..thought it was wonderful! Ha! Silly girl! Your pie looks so goodthat crust! I always use ready-made pie crust, keep things simple. I also like to parboil my carrots, potatoes and diced celery in the microwave before adding to pan. Pinned this recipe. Have a really good week.chat soon.
I’ve seen you use pureed beets in quite a few recipes. I am looking to cut out some steps to make these recipes a little less time consuming. I bought beet powder . . . how thick are pureed beets? I’m sure they add some liquid. Do you think it would work to mix the beet powder with applesauce? My applesauce is pretty runny, so I wasn’t sure about consistency. Also wondering about pureed banana.. Since you have so much experience in recipe tweaking I’d love to hear your idea! Thanks so much! My daughter has PANDA Syndrome and my son has multiple food allergies, so we are cutting sugar and aiming for health–so glad we found your site! Appreciate you sharing all your hard work!
The puréed beets don’t affect the texture all too much, it’s almost purely for color. You could probably just add 1 tbs of beet powder to the recipe no problem! I’m really happy you found my blog too — I hope you all love the recipes you try! 🙂
Pingback: The BEST Blood Orange Curd Recipe (sugar free, low carb, vegan)