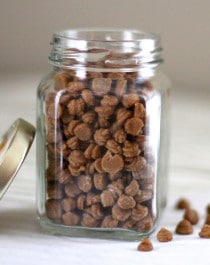
Healthy Homemade Butterscotch Chips
Ingredients
No-Bake Version: Yields 1 cup
- 3 tbs Coconut Oil (melted)
- 1 tbs Molasses
- 1 tsp Natural Butter Flavor
- 80g (½ cup) Powdered Erythritol (sifted)
- 2 tsp Arrowroot Starch
Bake-able Version: Yields 3½ cups
- 1 cup Light Coconut Milk (canned)
- ¼ cup Coconut Oil (melted)
- ¼ tsp Salt
- ¼ cup Molasses
- ¼ cup Water
- 1 cup Granulated Erythritol
- ½ cup Sucanat
- 1 tsp Vanilla Extract
Instructions
For the No-Bake Version:
- Line a cookie sheet with parchment paper.
- In a medium-sized bowl, stir together the coconut oil, molasses, and butter flavor.
- In a small bowl, whisk together the erythritol and starch. Dump into the wet ingredients and stir together. Mixture should look like a ball of fudge.
- Place mixture into a heavy-duty piping bag (do not use a plastic piping bag or sandwich bag as it will break) and pipe onto the cookie sheet. This will take a while, FYI, the mixture is thick and will take some hand strength!
- Refrigerate the chips for ~3 hours, or until firm. Place into a jar, seal tightly, and refrigerate to store.
For the Bake-able Version:
- Spray a 9″ brownie pan with cooking spray and line with parchment paper both ways.
- In a small bowl, whisk together the coconut milk, coconut oil, and salt.
- In a small saucepan, whisk together the molasses, water, erythritol, and sucanat. Add a candy thermometer and place over medium-high heat. Do not stir, just let it come to a boil.
- At 250 degrees Fahrenheit, remove the pan from the heat and whisk in the milk/oil mixture. Stop whisking once it's all added and return to medium-high heat.
- When it reaches 250 degrees Fahrenheit, turn off the heat and whisk in the vanilla. Pour into the prepared pan and let sit at room temperature overnight.
- Refrigerate for ~30 minutes before slicing. Slice the butterscotch square with a sharp knife or pizza cutter (it will be a little sticky). You can either slice the strips you’ve made into chips with a knife or break it into pieces by hand (I started with the knife and moved on to use my fingers). Place into a jar, seal tightly, and refrigerate to store.