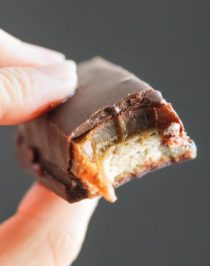
Homemade Twix Candy Bars
These guilt free homemade Twix candy bars taste just like the original, except these are all natural, vegan, dairy free, and reduced sugar. One bite and you'll think you're eating something full of sugar, fat, and calories, but you're not!
Ingredients
Biscuit Base:
- ½ tube Immaculate Baking Co. Organic Crescent Rolls (just 2 rolls, not all 4)
Caramel Filling:
- ⅔ cup Light Coconut Milk (canned)
- 56g (¼ cup ) Coconut Oil (melted)
- ¼ tsp Salt
- 252g (¾ cup) Pure Maple Syrup
- 2 tbs Water
- 192g (1 cup) Sucanat
- 96g (½ cup) Granulated Erythritol
- 1 tsp Vanilla Extract
Chocolate Coating:
- one batch Homemade Chocolate Coating (or ~6oz Dark Chocolate**)
Instructions
For the Biscuit Base:
- Preheat your oven to 350 degrees Fahrenheit.
- Press the crescent roll dough into an unlined, ungreased 8x8" brownie pan. Bake for ~12 minutes, or until surface is just slightly golden brown. DO NOT OVERBAKE! Let cool in the pan.
For the Caramel Filling:
- In a small bowl, whisk together the coconut milk, coconut oil, and salt. Set aside.
- In a 2- or 3-quart saucepan, add the maple syrup, water, sucanat, and erythritol. Do not stir. Add a candy thermometer to the pan and place over medium-high heat.
- Without stirring, let the mixture come to a boil. When it reaches 250 degrees Fahrenheit, whisk in the set aside coconut milk/oil mixture.
- Let the mixture come to a boil again. When it reaches 266 degrees Fahrenheit, remove from the heat and whisk in the vanilla extract. Pour over the baked crust and let cool for ~3 hours, then place in the refrigerator to cool and firm up completely.
For the Chocolate Coating:
- Grease an offset spatula and run it along the edges of the brownie pan to separate the caramel+biscuit layer from the pan, then use pie servers or a pancake turner to transfer the entire block onto a cutting board.
- With a greased knife, slice the block into 18 bars (I sliced the block 3 x 6 to get 18). Refrigerate for 1 hour and prepare the Chocolate Coating while the bars chill.
- Line a large baking sheet with parchment paper and place it in the fridge so that it's cold.
- When the Chocolate Coating has the consistency of melted dark chocolate, dip the Twix one at a time, and transfer onto the chilled baking sheet. When all the Twix have been coated, refrigerate until the chocolate is completely firm. Serve and enjoy!
Recipe Notes
**There will be some chocolate leftover. Feel free to chill the Twix and re-coat with a second layer of chocolate!
Caramel adapted from the Soft Caramels in my Naughty or Nice Cookbook!