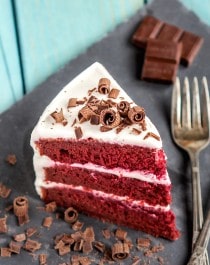
Healthy Red Velvet Cake with Cream Cheese Frosting
This is definitely an exciting cake to share. As embarrassing as it is, it took me nine trials to make a successful all-natural, nutritionally balanced, healthy Red Velvet Cake. I’ve done the research, I’ve done the measuring, I’ve done the thinking, and I’ve definitely done the taste testing (where do you think all those batches went?!). Thank goodness every trial was healthy, otherwise my hips would be hanging off the seat as I type this…
Anyways, making a tasty and healthy Red Velvet Cake took a lot more work than I thought. The batter has to be acidic, the cake has to be moist, it has to taste sweet sweet sweet, and lastly, it has to look red. Duh. But to meet my standards, the recipe also has to be good for you, which is quite the contrary to the classic Southern recipe. Here are the ingredients I had to swap:
- AP Flour, Cake Flour > Whole Grain Gluten-Free Flours
- Oil, Butter, Shortening > Beet Puree, Coconut Oil
- Artificial Food Coloring > Natural Food Coloring
- Eggs, Egg Yolks > Egg Whites
- Buttermilk > Unsweetened Almond Milk
- Sugar > All-Natural Erythritol
That’s a lot of substituting to make, yes? So, I guess we should start from the beginning: Trial #1.
Take a deep breath…
Trial #1:
I based the recipe off my Citrus Pound Cake recipe, since that is the recipe my friends and family request me to make the most. The texture was great, but had no flavor whatsoever. The cake was reddish, but not burn-your-eyes-out red like the classic red velvet cakes. The frosting was too thin and wasn’t very sweet.
Trial #2:
I improved some of the problems from Trial #1, but the cake tasted off. I tried coloring it without food coloring by using beet puree but it turned more like a faded fuchsia. There wasn’t enough cocoa and the cake was a little dry.
Trial #3:
I changed routes and decided to make Red Velvet Brownies rather than cake. I based the recipe off my Lemony Peach Blondies, but it turned a Devil’s Food Cake color and tasted too much of chocolate to be a red velvet.
Trial #4:
I fixed some of the problems from Trial #3 but the brownies still had that Devil’s Food Cake color. The brownies were extremely doughy, sticky and difficult to slice. It had a less noticeable chocolate flavor, but now it had no flavor.
Trial #5:
This trial ended up being really doughy and sticky as well. It was slightly cakey and had a great taste but the flavor was simply not that of a red velvet. Unfortunately, it was an unappealing faded red-brown color. Ugly, but tasty!
Trial #6:
This trial = DISASTER! I doubled the recipe and baked the batter in cake pans rather than brownie pans. The cake was soft, moist and delicious, yet a little on the dense side. I tried using a different brand of food coloring but it turned the cake a hideous greyish-brown color. While people liked the cake, no one really understood what the main flavor was. I told them it was supposed to be a red velvet but ended up looking like chocolate. Didn’t matter too much though, cake is cake. And it’s healthy? Okay, this cake is good cake!
Trial #7:
I quit it with the red and made this (Orange Velvet) Pumpkin Cake instead.
Trial #8:
I did some more research on how to get a cake to turn red naturally. It’s a science, not something I could guess on. So when I sliced into this cake I thought I was going to see red. Oh I saw red, just not in the freaking cake. GAH! I wanted to cry and throw my stand mixer out the window smush the cake with my hands. I carved myself a slice and angrily shoved it in my face. Oh. My. Gosh… it was delicious. It was a bit dense, like the previous trial, but so damn good.
Trial #9: (Finally, success!)
Before I even turned on the oven, I expected a baking failure that day. I mean, I was let down 8 times already, my confidence in baking truncated with each failed trial… I expected less than post-worthy results that day. To my surprise, though, things were looking up! The batter was a bright fuchsia and turned more and more red as the cakes baked in the oven. Good things do happen when you least expect them to. I sliced the cake and my heart skipped a beat, I almost fainted.
FINALLY. It was RED! (Thank you baking gods)
I was so excited to take a bite that I ate a slice right off the cake stand.
This Healthy Red Velvet Cake is absolutely delicious. It’s sweet, it’s fluffy, it’s moist, it’s red. Naturally red. It’s nutritious, free of sugar, butter, and all things artificial and manmade.
If you gave this to me when I was ten years old (you know, when I ate three Hershey bars a day and ate Pillsbury frosting out of the tub?), I would have eaten this without any complaints. I would have eaten this with my hands (because who needs a fork?) in about 2 minutes flat.
Oh wait, that’s what I did as a twenty year old…
Anywaysss, this cake is magnificent. Both a success and accomplishment that were a long time coming. Nine trials long, but totally worth every hour spent researching (and eating).

Healthy Red Velvet Cake with Cream Cheese Frosting
Ingredients
- Beets
- Oat Flour
- Brown Rice Flour
- Granulated Erythritol
- Arrowroot Starch
- Unsweetened Natural Cocoa Powder
- Double-Acting Baking Powder
- Salt
- Egg Whites
- Unsweetened Vanilla Almond Milk
- Natural Red Food Coloring
- Organic Raw Cacao Butter
- Coconut Oil
- Vanilla Paste
- Natural Butter Flavor
- Liquid Stevia Extract
- White Vinegar
Instructions
- You can find the full recipe and instructions in the Naughty or Nice Cookbook!
Recipe Notes
Enjoy!
.
Be happy.
Live fully.
Feel naughty, eat nice.
.
– Jess
.
Indulge − no strings attached!


YOU DID IT!!!!
You finally came up with the perfect red velvet cake recipe. I’m almost jealous. It looks so amazing too! (So does trial #8… I say you should’ve posted that one too!)
I think I’m gonna have to give this one a try… seriously, it just looks perfect in every way. I want a piece right now!
Pinning! 🙂
Oh, btw, congrats on the new look and name. Love it! Absolutely love it! 🙂
OH. MY. GOSH. Ten tries, you’re a trooper. I would have given up. I need to show this to my baking friend. She has been trying to dye red velvet cake naturally for a while now. By the way, it looks just incredible.
Wow!!! It looks wonderful!! I need an occasion to make this ^^
Do you think I could puree canned beets if I’m lazy? Would that work, or are roasted beets necessary?
I used canned beets in one of the trials and it didn’t give off as bright a red color as the freshly roasted beets, probably because the color is diluted in the water the beets are canned in… however, you can give it a try because the recipe provided is more likely to retain the red color because of its acidity. If you try it, let me know how it turns out! Fingers crossed 🙂
Wow Jessica. Thats so much work you did and one perfect cake =-O.
I love the color and Im sure it tastes as good as it looks!
Your cake looks beautiful! You did a wonderful job making this one healthy with beet puree – I need to try this sometime 🙂
Mmm, this looks so divine! The colour is so intense, it looks totally fab!
Yes, I make all my nut butters with that food processor. I love the small size and small price tag, but it takes a few minutes longer to turn the nut into a nut butter than a larger food processor. You have to scrape down the sides of the bowl more often, too, but it’s not a huge deal. If you are a nut butter freak, I would suggest a slightly larger processor, but if you use it mostly for small kitchen projects and the occasional nut butter, it’s perfect 🙂
(Also, the type of nut makes a difference. Softer nuts like walnuts are super easy to butterize, but dryer nuts like hazelnuts take a bit longer)
Hope I helped!
Wow, your site looks amazing!! I love the new design and name change. This cake looks absolutely fabulous! Thanks for going through all those trials… 9, holy cow. I think I would have given up after the 3rd! I’m so glad you kept going. This will be the perfect cake for Valentines!
Thank you so much for answering my questions 🙂 It sounds like that food processor would suit my food-processing needs and my small kitchen perfectly!
This is awesome! I can’t wait to try this – I’m just recently trying to eat gluten-free to help manage my chronic headaches, but I love cake so much – Now I can have cake!
Aww, I’m so sorry gluten does that to you! Well, I hope you enjoy the headache-free cake 🙂
It is amazing what you can do with these alternative ingredients. this cake looks so beautiful that I featured it on my Friday Five Valentine sweets addition over @ Feed Your Soul – http://chefpeterskitchen.blogspot.com/2013/02/friday-five-valentines-issue.html
Can you recommend a different sweetener, I don’t have erythritol. can I use granulated stevia?
Also I will be using coconut oil instead of vege shortening for the frosting. Any recommendations for a sub for the powdered erythritol?
Thanks, I LOVE YOUR SITE!!!!!
You can use any dry sweetener to replace the erythritol, as long as it’s a 1:1 ratio replacement for sugar. Any powdered sweetener can replace the powdered erythritol. Good luck I hope you like the recipe!!
I thought the beets would lend their color to the cake batter. So, did the color “rust” in the heat of baking? Is the added natural food coloring what made the difference in last attempt?
can’t wait to make this for my nieces, thanks for all your effort & sharing 😀
The color actually got better with baking, probably due to the batter’s acidity. The batter was bright fuschia and turned red. There was no discoloring from the baking pan (I got that in my previous trials, where the center was a little red but the outside just brown) which was awesome. I think the food coloring is what made this a red velvet… the beets alone are just hot pink… super hot pink lol.
I hope you and your nieces LOVE the recipe!
-Jess 🙂
So, I made this today! I used canned beets and substituted coconut milk for the food coloring because I wasn’t particularly interested in the red color. I rather expected this to be somewhat of a dud because I didn’t really follow the recipe to a T, but it is SO AMAZINGLY GOOD. I couldn’t believe it, it tastes like a sugar-butter-flour cake, quite like the chocolate cake my mom used to make. THANK YOU, JESSICA! Your 9 trials have not been in vain! I can’t wait to eat this all up so I can make it again!!!!!
Oh yayyy I’m so glad the cake turned out well for you! After 9 trials I think I’m too spent to make any more adjustments to the recipe, so I’m glad your venture turned out so great! Thanks for sharing your results 🙂
-Jess
Hi,
This is a fantastic recipe, and great fun to make with the kids. Thanks so much for posting it.
All the best, Alex
Pingback: Desserts With Benefits
Pingback: Desserts With Benefits
Pingback: Desserts With Benefits
Pingback: Desserts With Benefits
Pingback: Desserts With Benefits
Pingback: Desserts With Benefits
Pingback: Desserts With Benefits
Thanks for this awesome recipe! Making it for my son’s birthday this week. I was going to make the cake the day before and then frost it the following day. Should the cake be refrigerated when it’s unfrosted? What about when it’s frosted?
Thanks!
Nikki
Pingback: Red Velvet Pumpkin Cupcakes with Chocolate Pumpkin Cream Cheese Frosting | True Healthy Me
Pingback: Desserts With Benefits
Pingback: Desserts With Benefits
Pingback: Desserts With Benefits
this sounds great, can’t wait to make this cake, I am now on a glutin free trial, and love cake, so this should satisfiy my taste buds beautifully. Thank you very much for all your hard work and sharing. Can I sustitue the coconut milk with something else as I am alergic to coconut? cheers, Pauline 🙂
Pauline-
Any other “milk” should substitute the coconut milk just fine. My favorite is almond milk. Soy milk, any other nut milk and (preferably organic) dairy milk should work just fine 🙂
I hope you like the cake!!
-Jess
Hi jessica..
Thank you for your recipe
I was greatly helped by the recipes that you create.
because I was conducting research for my thesis about making healthy red velvet..
I’ve tried to make this cake with a few different ingredients.
The recipe
244g (1 cup) Roasted Beet Puree (see instructions) + 1 tbs Lemon Juice
1/2 cup Unsweetened Almond Milk (i use Unsweetened Soya Milk
183g (3/4 cup) Egg Whites
96g (1/2 cup) Granulated Erythritol (i use low calorie sugar for cook/baking)
14g (1 tbs) Grapeseed Oil
2 tsp Stevia Extract (i didn’t use it)
2 tsp Vanilla Extract
1 tsp Butter Extract (i didn’t use it)
120g (1 cup) Oat Flour (I use Modified cassava or Mocaf Flour)
120g (3/4 cup) Brown Rice Flour
32g (1/4 cup) Arrowroot Starch
1 tsp Baking Powder
1/2 tsp Salt
15g (3 tbs) Regular Cocoa Powder (unsweetened)
4 tbs Natural Red Food Coloring (I used Natures Flavors)
1/2 tsp Baking Soda
1 tbs White Vinegar (I use Apple Vinegar)
How? 😀
i want to ask you about this your recipe
whether if it removes ingredients(stevia extract,butter extract) make effect on the cake?
if yes, is there a substitute ingredient for it?
FYI: in indonesia cake always made from margarine.. can i change the butter extract with this?
Thank you for your helping.. i’m sorry for my english.. 🙂
Pingback: Desserts With Benefits
Hi! I had a few questions, so I tried the recipe last night and could still taste the beets and it did not rise as much as I had expected (might have been because I thought we were supposed to combine all wet ingredients together and all dry ingredients together so I didn’t make the vinegar/baking soda mixture as instructed :/). However, I plan on trying it again but had a few questions:
1) The ingredients state 120g brown rice flour but only 3/4c is this accurate or is there a typo in the number of grams?
2) if we decide to omit the red food coloring will we need to add anything to the batter or is it fine to just leave it out altogether? I don’t care too much about the color being so red.
3) is the stevia extract a liquid or a powder?
Thank you in advance! 🙂
Oh no! I have no idea why you could taste the beets. The baking soda and vinegar mixture shouldn’t have changed the flavor of the cake too much, it’s more for the red color.
1) I baked this cake by weight, I just provide the volumetric measurements as a guideline. According to the brown rice flour I use (Bob’s Red Mill), 1/4 cup = 40g… I used 120g so that should equal something around 3/4 cup.
2) If you omit the red food coloring, simply increase the amount of almond milk by 1/4 cup.
3) The stevia extract I use it liquid.
Hope this helps!!
-Jess
Hi Jessica! In my cake i also tasted the beets slightly though i didn’t change the recipe and it didn’t raise as yours. Could you please explain why do we need mix soda and vinegar separately? I thought that soda and acid should react with each other in the process of baking to cause the batter to raise properly. Are your food coloring liquid or dry? Mine didn’t make the cake red, it was just brown:))) I’m not complaining actually, it was almost my first experiment with such a recipe)) i think that i did smth wrong and next time it should be perfect! thank you for your help!^_^
Oh no, I’m sorry you tasted the beets! Not sure why that happened???
Just wondering, did you weigh out your ingredients and do you use an oven thermometer? Off measurements and an off temperature can affect the flavor and texture of a cake. I always recommend using a kitchen scale rather than measuring them with measuring cups and measuring spoons. I’m also wondering what food coloring you used. The liquid food coloring I used is all natural. The vinegar activates the baking soda and the baking soda activates the cocoa powder. It’s important to work quickly after adding the baking soda/vinegar bubbly mixture into the batter. This helps provide lift in the cake.
Hopefully this helped!! 🙂
-Jess
Can you sub xylitol for erythritol?
Megan-
Yup, xylitol should work just fine! Hope you like the cake 🙂
-Jess
Pingback: Chocolate Chip Beet Brownies and Cream Cheese Frosting | threechickstalkingaboutfood
Hi Jess! Your cake looks amazing and I can’t wait to make it. Here in Australia oats cannot be labelled as gluten free so I am wondering whether you could suggest a gluten free substitute for them? Thanks!
Hmmm, oat flour is a pretty unique ingredient, but I’m sure Sorghum Flour or more Brown Rice Flour should do it. The texture might be more crumbly though, so you might want to use 3/4 cup worth of WHOLE eggs instead of egg whites. If you want to keep the egg whites, then I would recommend adding 1/2 tsp of Xanthan Gum. Hope the cake works out and I hope you love it!!
-Jess
Pingback: Desserts With Benefits
Pingback: Mini Red Velvet Cake with Fluffy Coconut Cream Frosting | The Vegan Cookie Fairy
Amazing! I love the idea of beets in red velvet cake. It sounds so much better than a bottle of red food coloring!!
Thanks so much Martha! Even though the FDA allows artificial food coloring, I just can’t wrap my head around what it’s made of and its potential health hazards…. AHHH!
I hope you get to try the recipe 🙂
-Jess
Pingback: Gluten-Free Dessert Recipes
Pingback: Desserts With Benefits
Can I substitute the vanilla or chocolate SunWarrior powder for Sunwarrior® Warrior Blend Raw Protein – Natural? I would need more cocoa or vanilla flavors, to compensate… Just trying to stay as natural as possible…
Tiffany-
I’m so glad you want to try the recipe! 🙂
I haven’t tried SunWarrior’s raw protein powder before so I can’t be 100% sure, but I’ve received some comments on my protein bar recipes saying that other vegan protein powders substitute the brown rice protein powder just fine. So, I hope it works, eek!
You will definitely need to add some vanilla extract or vanilla paste (about 1-2 tsp) to the frosting to compensate for the vanilla flavor.
I hope you like the cake!!
-Jess
Thank you so much for you fast response!! I’ve been gluten free for over 1.5 years and I’m considering becoming Paleo, or at least 90% Paleo… So for that 10% I would cheat on, I would like to use your healthy ideas so that I’m not ruining all my progress!!
I looked on the SunWarrior site and found that one with only a few items and despite there being “Paleo protein powders”, they are processed egg whites… Which isn’t ideal. I’m aiming for less processed! 🙂
🙂
Hi, Jessica,
I am truly impressed with all your healthy ideas for all the delicious treats! I’ve made a few of them (I made the brownies) and they were amazing!!! I have a question though: I have kids and I am afraid of giving them any kind of a protein powder, be it soy or whey. Is there a way to make your amazing frostings without using the powders? ( I know that you’re using it to emulsify them, but maybe tofu will do? ) Thanks again, you are wonderful!
Aw thank you so much! I’m glad you liked the brownies 🙂
I personally don’t think you should be afraid of giving your kids protein powders (as long as they’re 100% natural, organic and non-GMO, like the brown rice protein powder used in this recipe), but I totally understand your hesitation. Definitely ask your child’s doctor and/or a registered dietician for advice.
You can probably follow the frosting recipe but just omit the protein powder AND the coconut milk, and add 1/2 tsp vanilla extract.
1. Make sure the non-hydrogenated shortening is softened and place it in a bowl. Whisk in the extracts and lemon juice, then whisk in the erythritol.
2. Drain a refrigerated carton of organic/non-GMO firm tofu from the water and press the block between a few towels or paper towels to get the excess water out. You want to get as much liquid out as possible! Puree it in a blender or food processor until smooth, then add the frosting ingredients from before into the blender/food processor. Give it a taste and add more stevia, butter extract or vanilla if it needs it (it most likely will since tofu is very bland and the protein powder omitted had some flavor in it).
I haven’t tried this recipe variation, but I hope it works out for you! And I hope you all like the cake too 🙂
-Jess
This is a great recipe, I have one that is very similar. I use Kefir cheese for the frosting, its like yoghurt but has the consistency of cream frosting- I beat it with vanilla and stevia, its much healthier and has fewer calories than shortening.
Sylvia Forman-
Great idea with the Kefir Cheese instead of the shortening! I’m sure Greek Yogurt, cream cheese and coconut cream would work too!
Thanks for the tip 🙂
-Jess
Pingback: Star Feature! An Amazing Recipe by the fantabulous Jessica at Desserts With Benefits™! | Gluten Free and All Things Nice
Jessica! This looks so good. I am unfortunately sensitive to brown rice, is there another flour that I could use instead of the brown rice flour? Thanks!
I haven’t tried this recipe with another flour, but you can try sorghum flour instead! I’ve used it in place of brown rice flour in other cake recipes 🙂
I hope this works!
-Jess
Hey!
Love this site – its great! Ive a few questions though. Ive tried many of your recipes and many fail 🙁
Im just wondering, maybe im doing something wrong? Why exactly do you call for vinegar in the baking mix? (as you dont use anything to balance the acid – the baking powder contains an equal mix of acid and base to be neutralised…so why do you not add baking soda if you add vinegar?) And i dont understand this: (i read the comments above)
“The vinegar activates the baking soda and the baking soda activates the cocoa powder” – vinegar and baking soda will react to form a salt and water, with CO2 gas. This cannot then react with the cocoa powder…there is no base left to react with the acidic cocoa?
Also, i notice that you dont really use xanthan gum, i usually add a little..do you think that could be scewing the recipe?
And ONE last thing (sorry!!) when you say “whip the batter”, is that not beating out all the airy pockets you make from the acid/base reaction? Maybe thats whats happening me?
Sorry for so many questions i just get so annoyed with gf baking sometimes!!
xxx
I’m sorry you haven’t had much luck 🙁
One essential kitchen tool for my recipes is a kitchen scale. Baking is temperamental and a scale is the most accurate measuring tool.
As for this recipe, an acidic batter retains a bright red color, while a basic batter will turn brown. The vinegar helps keep the acidity level high. Also, the recipe actually does call for baking soda, which reacts with the vinegar to create a foam and acts as a rising agent.
In this recipe, I don’t use xanthan gum because oat flour acts as a binding agent because of the soluble fiber. I usually only use xanthan gum in recipes with sorghum flour and brown rice flour because they make for crumbly baked goods.
Make sure to read over the recipe instructions because I don’t tell you to whip the batter. You just need to lightly mix the vinegar/baking soda mixture into the batter for ~10 seconds 🙂
Make sure not to whip the batter too much after adding this, and don’t let the batter sit for too long. Baking soda is a time sensitive ingredient. If it sits too long in a batter at room temp, it won’t work as well as when it’s fresh. I hope this helps! 🙂
-Jess
Hey Jess, thanks for the suggestion! I will try it with that sorghum flour and let you know how it turns out!
Ohh right oops i missed the baking soda completely! woops! But i noticed in other recipes you use like a whole tablespoon of vinegar when you dont use any baking soda? is there another ingredient in the recipe thats basic?
Im going to try this again and get back to you!
Hi,
I do not find stevia extract / powder and brown rice protein powder. How can I substitute the two in this recipe. Is there a substitution at all ? Can I avoid these two and not make much difference to the recipe?
Thanks for your help
Prathima-
I’m afraid this recipe won’t work without the stevia or brown rice protein powder. The stevia in the cake replaces 2 cups of sugar, and the stevia in the frosting replaces 1/2 cup of sugar.
The brown rice protein powder thickens the frosting, and without it the frosting will be like a glaze 🙁
Sorry!
-Jess
Would this cake still turn out red(ish) if i omit the food colouring?
I haven’t tried it so I can’t be sure, but I have a feeling it won’t. It might be a dark red or just have a reddish tint, but it won’t be vibrant red like pictured.
-Jess
I love your site! I’ve been wanting to make some of your stuff for a while now but have a few questions:
I don’t really need a gluten-free recipe and gluten-free flours are way too expensive (I’m only a teenager lol) for one time use. Could I replace the oat and brown rice flour with regular wheat flour? Would I still need the starch then? Thanks in advance.
This recipe is a little different than most recipes… most gluten-free recipes can be easily adapted to use wheat flour instead, but this one not so much 🙁
The red color comes from the pH balance in the batter, and the oat flour/rice flour play a part in that. I’ve tried this recipe with other gluten-free flours and it didn’t end up red at all, so I’m afraid whole wheat flour will do the same. However, if you try it, use 1+3/4 cups Whole Wheat Pastry Flour (not regular Whole Wheat Flour) instead of the Oat Flour and Brown Rice Flour. Also, keep the starch in there, it’s good for the texture 🙂
Hope this helps!
-Jess